A Basic Guide To Shopify Shipping
In this article, I will show you how to set up shipping in Shopify. I will also provide you with fundamental knowledge about Shopify shipping principles and zones.
I will discuss:
- The benefits of configuring shipping with Shopify
- How to create shipping zones and free shipping in Shopify
- How to automate your shipping and fulfillment in Shopify with Tradelle
In the end, you should be able to toggle your Shopify shipping settings and create shipping rules that won’t cause financial losses.
Why Do You Need To Configure Shipping in Shopify?
Shopify is not a marketplace—you are essentially managing and operating your platform, so configuring shipping is a necessity. If you do not do this, especially if you sell internationally, you will lose money or some of your international customers will not be able to proceed with checking out.
Here are the reasons why you need to configure shipping in your Shopify store:
- Unique Shipping Rates – with separate shipping zones, you can charge customers from different regions different amounts. You can also set proper expectations about the length of time it would take to deliver the product.
- Prevent Financial Losses – you will never know how many items a customer will order. As such, it is wise to configure your shipping options in Shopify in terms of the product weight and dimensions of the package. You can also use calculated shipping rates to ensure accurate charges and prevent financial losses that typically happen to dropshippers who charge lower shipping fees than the actual cost of shipping.
- Focus on Markets – if you create shipping zones, customers in locations you do not ship to cannot complete the checkout. For example, if you only created one shipping zone, like Canada, no one else with a shipping address outside of Canada can complete the checkout process.
- Shipping Options – in Shopify, you have the choice to set up local deliveries and pick-up options.
Shipping is an important factor in customer satisfaction. Unclear shipping options can drive potential customers away. High shipping rates can do the same. As such, it is best to configure different shipping rates so customers will see that you are a fair businessperson.
In addition, Shopify also allows you to create free shipping or discounted rates—not by default. You have to configure this in various shipping zones. If you do, your site visitors are more likely to respond positively and complete the purchase.
The 5 Types of Shipping
There are five types of shipping that you can do with your Shopify store and products. These are:
- Free Shipping
- Single Flat Shipping Rate
- Tiered Flat Rates
- Per-Item Shipping Rates
- Advanced Shipping Rates
Let me give a brief overview of each.
1. Free Shipping
Free shipping means that you are not charging for shipping at all. In this case, you still have to configure your shipping zones, but you will not put a price on the shipping cost.
How you decide between free shipping and paid shipping depends on your business situation. Some dropshippers add the shipping price to the product sale price. Then, they do not charge for shipping anymore. This approach makes it look like shipping is free, but the customer paid for it.
2. Single Flat Shipping Rate
A single flat rate is a type of shipping where the consumer pays the same amount of shipping regardless of package size, weight, or dimension. If the customer orders two pieces, then he will also pay two shipping costs.
You can do a single flat rate for international customers. What it means is you can set a single flat rate per country.
Flat-rate shipping works best if you only have a few product types. For example, if you sell items that use the same box size or parcel size, there is no reason to create different shipping rates at all.
3. Tiered Flat Rates
A tiered flat rate refers to a type of shipping where the rate is based on weight or the type of product. You can also use a tiered flat rate based on the number of orders.
For example, let us say you are selling phone cases. For one to three phone cases, your shipping fee is $3. Now, if the customer orders more than three phone cases, the shipping rate is $7.
You use a tiered flat rate based on your shipping carrier’s shipping standards. For example, you can charge $3 for three phone cases because they will all fit in the same parcel or box. Anything more than three phone cases requires a bigger box or plastic mailer.
4. Per-Item Shipping Rates
Per-item shipping rate refers to a shipping cost per product. This type of shipping rate is what dropshippers typically use.
For example, let us say that you have two product suppliers, and you sell:
- Phone case – The shipping rate of your supplier is $3
- Car Phone Holder – The shipping rate of your supplier is $5
In this case, you must set up a per-item shipping rate in Shopify. Any customer who orders a phone case would pay $3. Any customer who orders a car phone holder would pay $5 in shipping. A customer who buys a phone case and a car phone holder would pay $3 and $5 = $8 in shipping.
5. Advanced Shipping Rates
Advanced shipping rates refer to a kind of shipping cost where the platform, or your store, would automatically change the rate of shipping based on the destination, package size, weight, etc. It also has something to do with the speed of shipping.
You will typically see this type of shipping rate in big platforms like Amazon where you have options like Standard, Express, etc. This kind of shipping rate is complicated, and you may need a plug-in or an app to make it possible in your Shopify store.
How to Set Up Shipping Rates In Your Shopify Store
Setting up your shipping rates in Shopify can be a bit overwhelming. Accurate product weights are crucial as they affect the shipping cost calculation. This guide will help you get started with shipping zones and how to configure your shipping.
What is a shipping zone?
The first thing I need to tell you is what a shipping zone is. A shipping zone is a group of countries where you offer the same shipping rates. For example, let us say that I want to ship a product to Norway, Sweden, and Finland because they occupy the same land mass. See below:
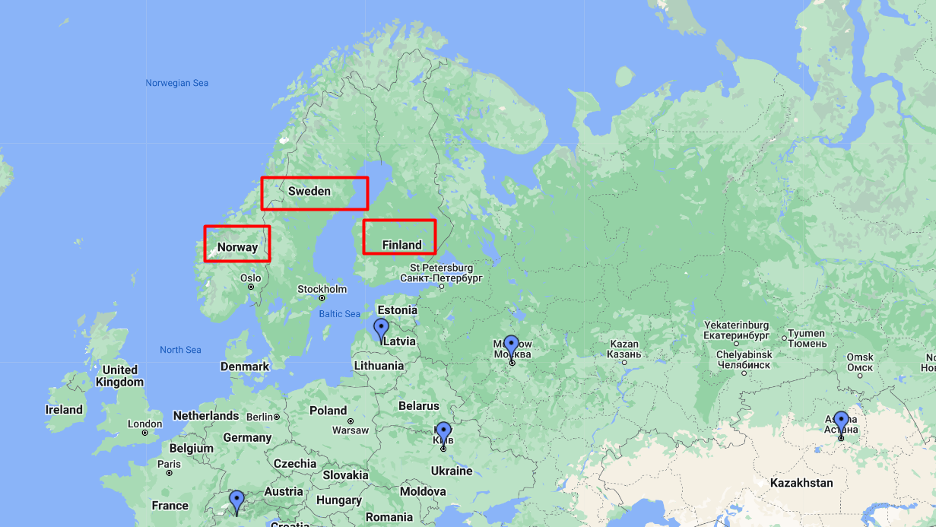
Let us say that the actual shipping rates are:
- Norway – $22.50
- Sweden – $25.50
- Finland – $28.50
In this case, I can decide to charge $28.50 for all three countries or create a shipping zone for each country. Let us say that I decided to do only one shipping zone.
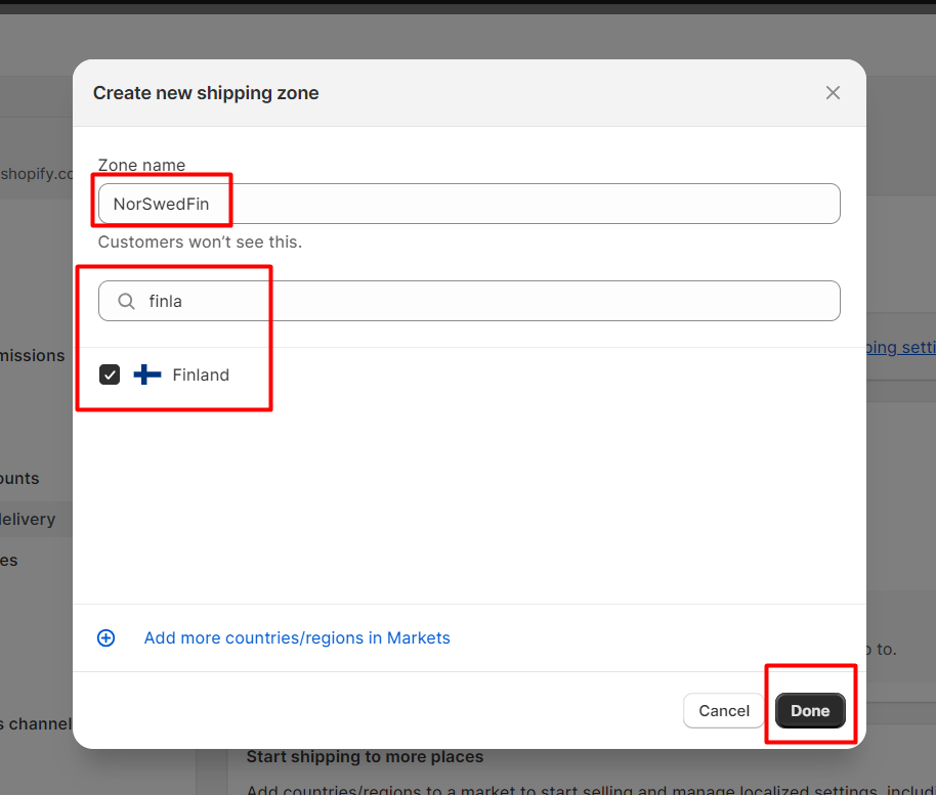
In Shopify, I can create a shipping zone, name it NorSwedFin (you can name the zone anything you want), and set the shipping price as $28.50.
Whenever a customer orders a product, if the shipping destination (country) he typed is either Norway, Sweden, or Finland, the Shopify system will automatically detect that country and use $28.50 as the default shipping rate.
If the customer types a country that is not in any of my default shipping zones, Shopify will not show any shipping cost. In addition to that, the customer cannot check out. Shopify will think that I do not ship to that country.
So, what does this mean? It means that you must create several shipping zones. If you want to set up one shipping price for each country, then you will have to set that up one by one.
Step-by-Step On How To Set Up Shopify Shipping
Now, let us put what we learned into practice. What we will do in this section is create a shipping zone for the example I gave above.
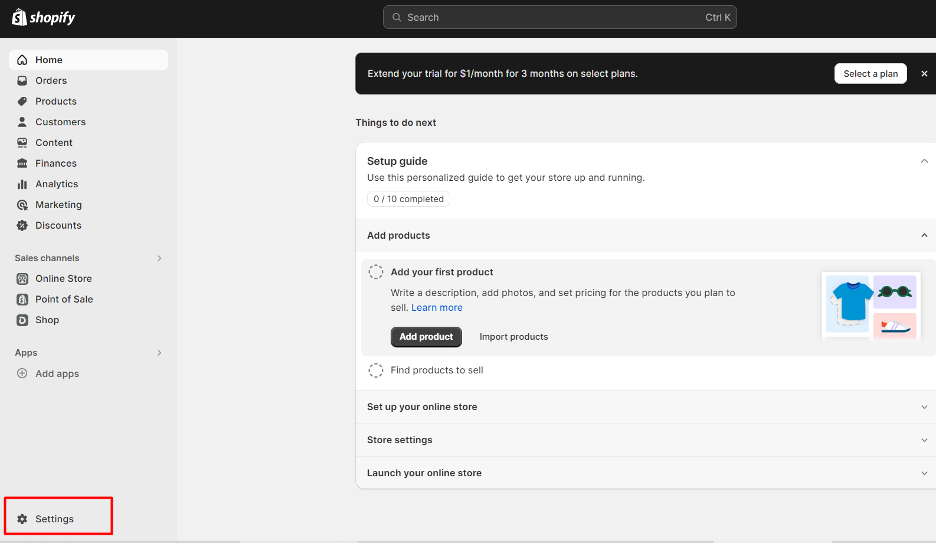
Step 1: Log in to Shopify and Click on Settings
Once you are in your Shopify admin dashboard, look at the SETTINGS link with the gear icon at the bottom left, as shown below:
Step 2: Click on Markets
The next step is to click on MARKETS, as shown below:
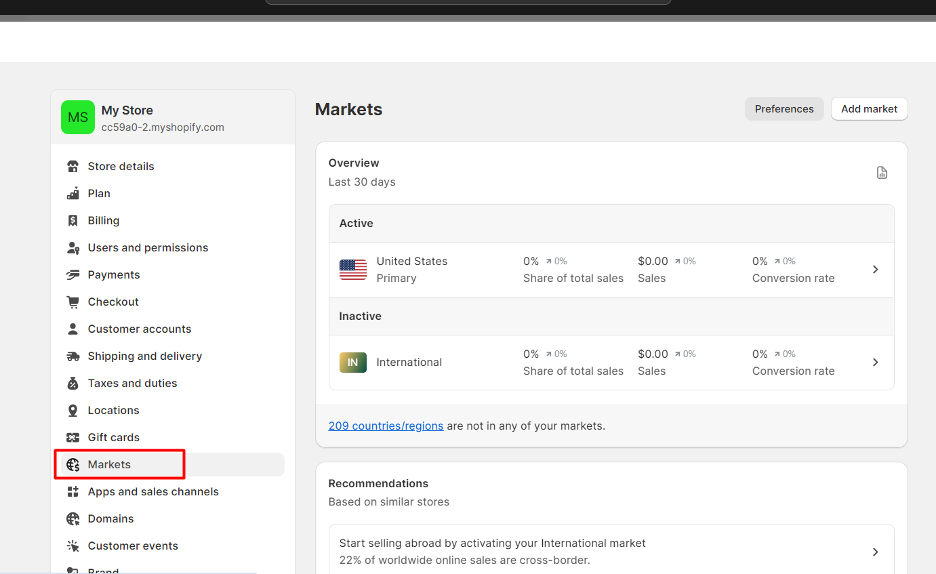
By default, you will see two options under your OVERVIEW section. The first market is your current location (which you chose when you created your Shopify account; in this case, the location is the USA), and the other one is international.
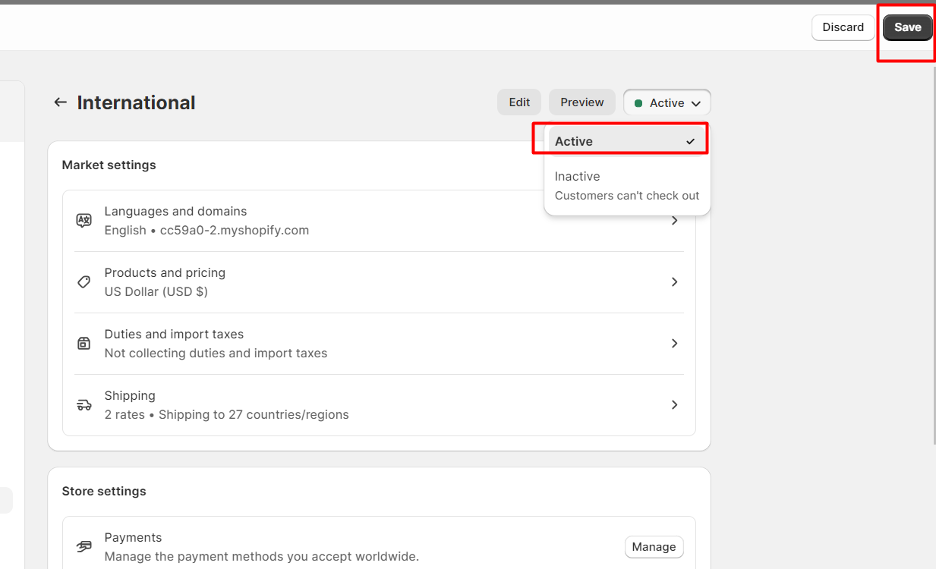
Click on INTERNATIONAL, and you will see this:
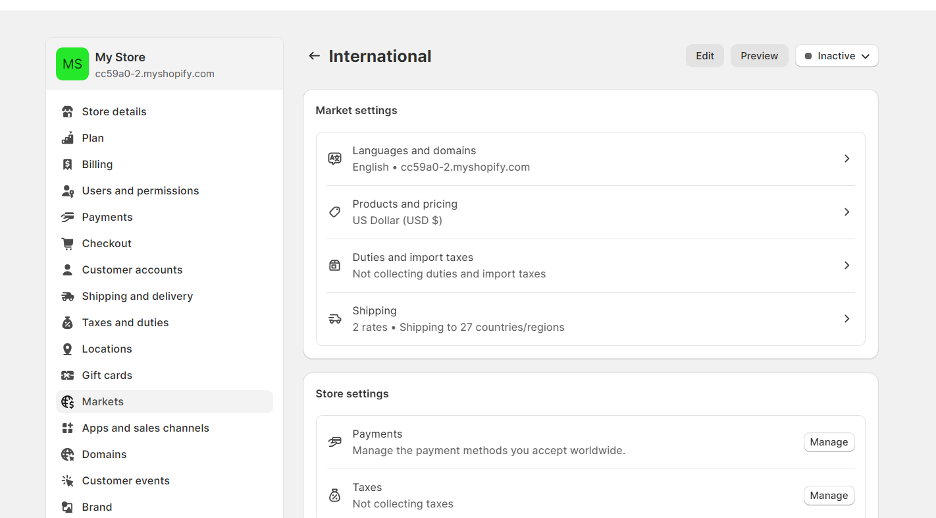
The next step is to click the button at the top right that says INACTIVE.
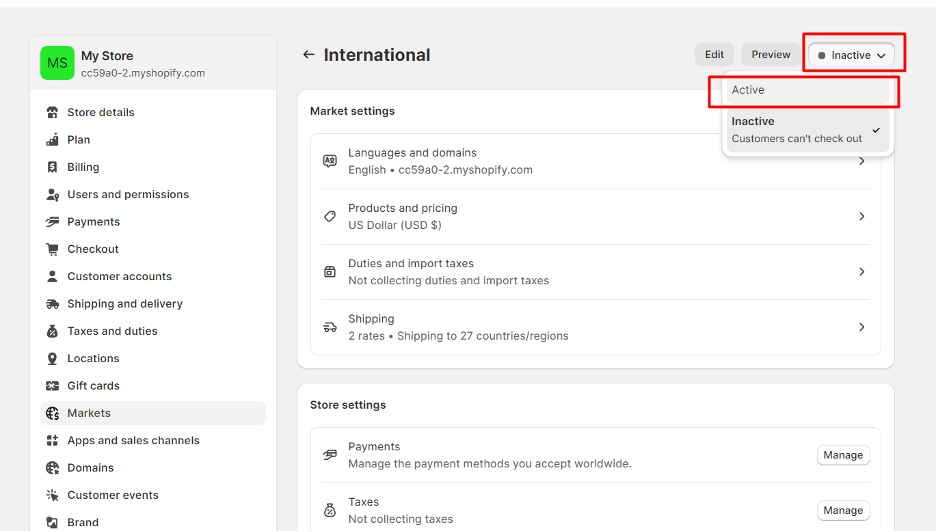
Select ACTIVE, and then click on SAVE.
Step 3: Add a Market or Add Countries to INTERNATIONAL
You have two options now. The first one is to add a different market, and the second one is to add countries to an existing market.
What is a market? Take a look at this:
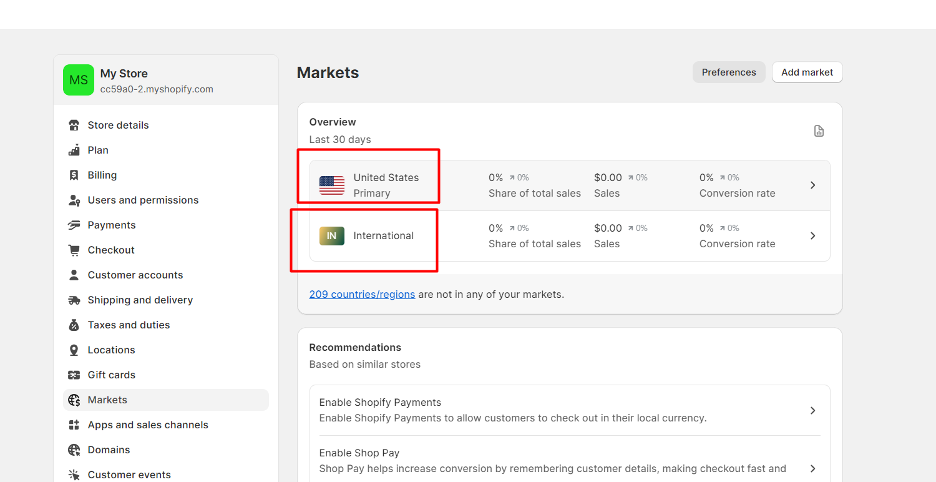
The US and INTERNATIONAL are two markets. There is a blue link on this page that says 209 countries/regions are not in any of my markets.
What I can do is either click on INTERNATIONAL or add countries to that market. However, I would rather add a new market so I can separate the shipping prices for them.
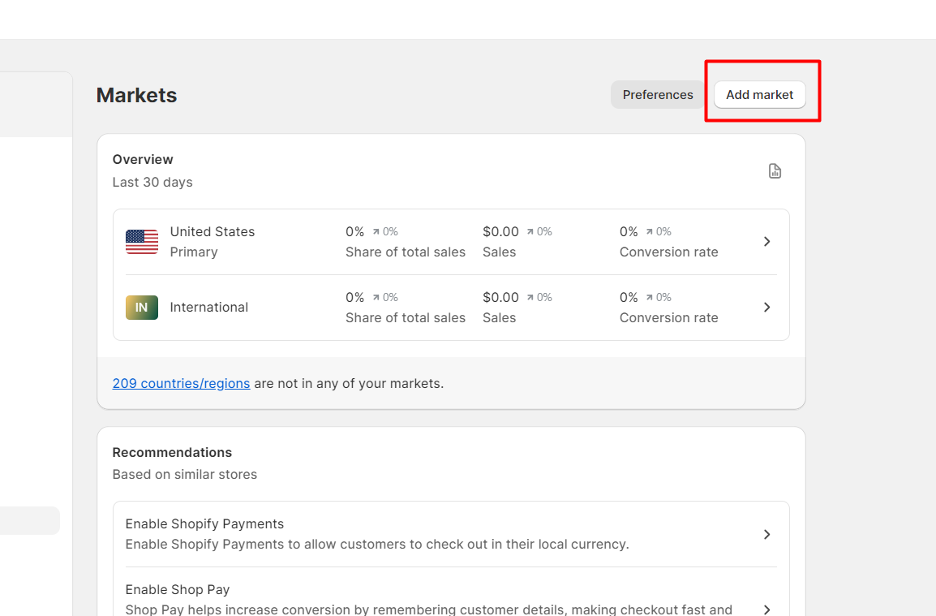
To do this, click on the ADD MARKET button at the top right, as shown here:
Then, you will see this:
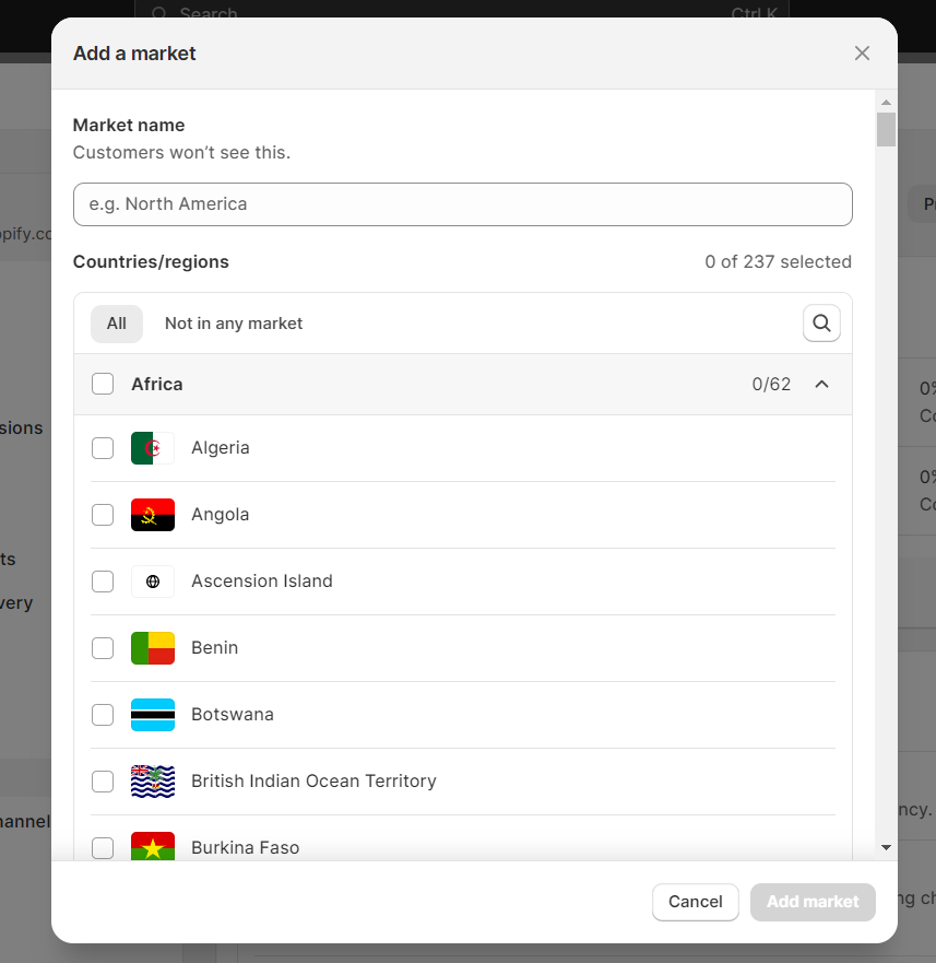
Under the market name, I will type NorSwedFin. This name allows me to easily identify what countries are in this market.
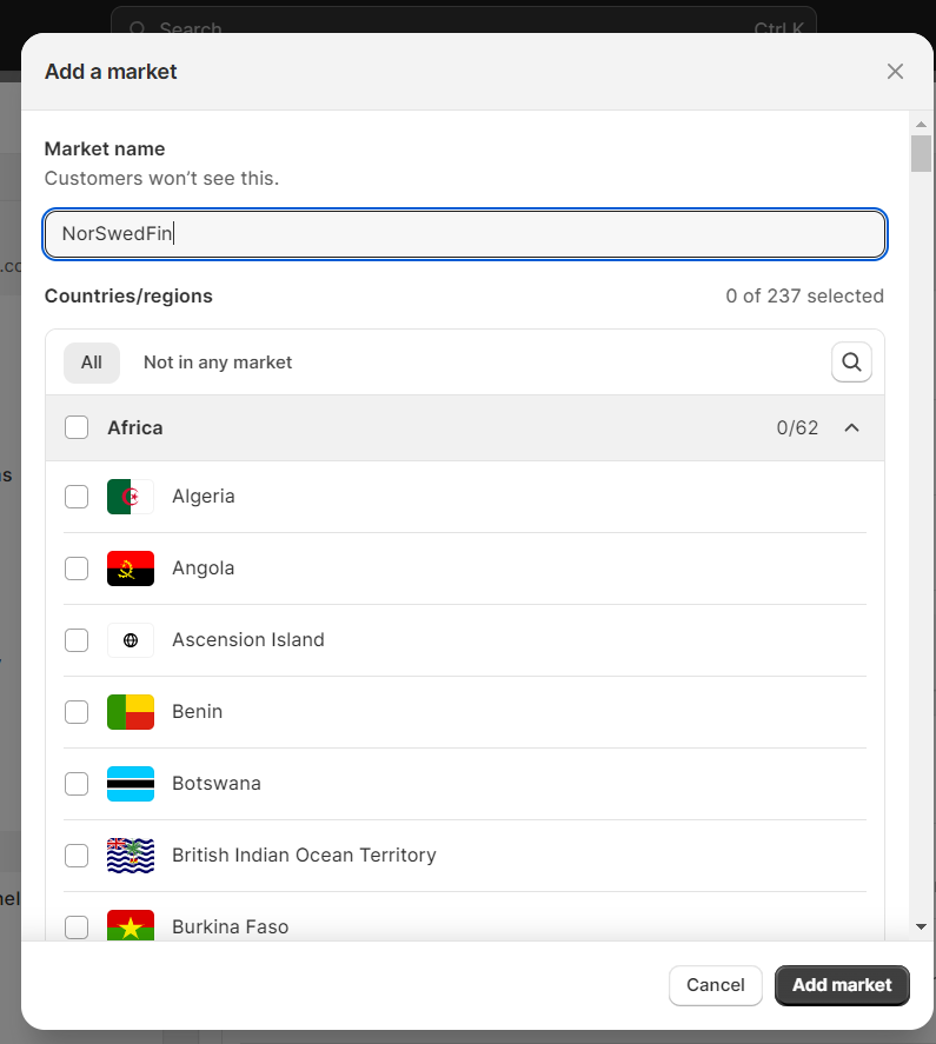
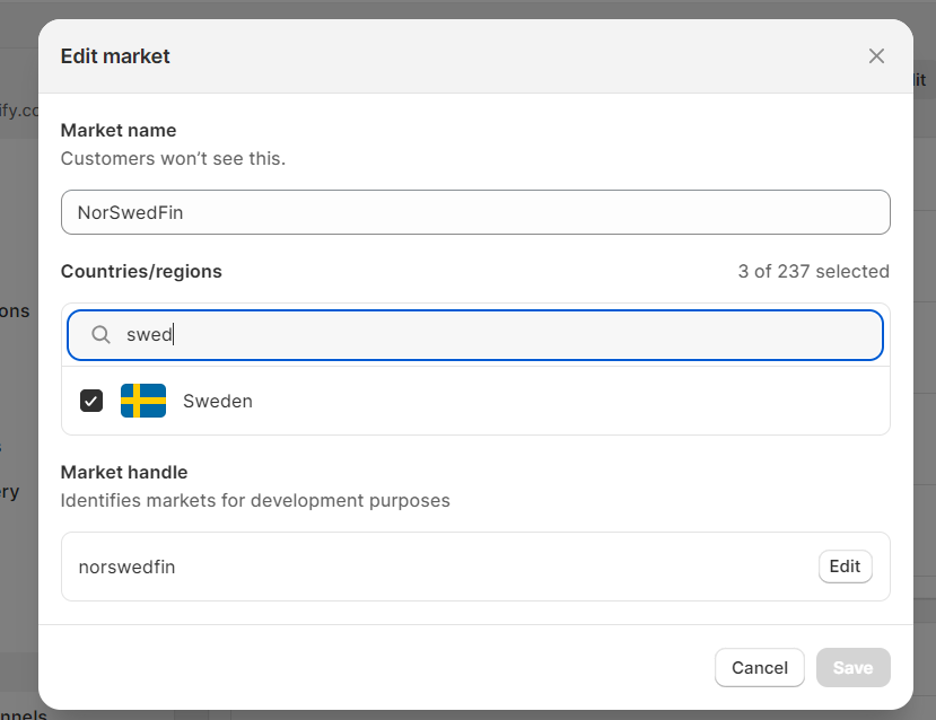
Then, I will select three countries, Norway, Sweden, and Finland, and add them to this market.
Step 4: Delete Default Shopify Settings
Now, we can click on SHIPPING AND DELIVERY and then click on our international rates.
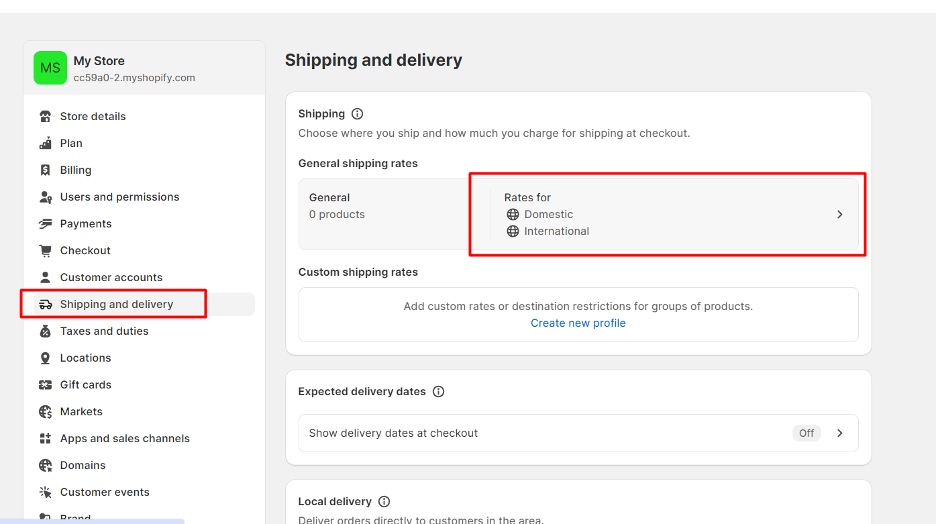
From here, look for the two shipping zones, Domestic and International, and delete them. These zones are auto-created by Shopify, and will only confuse the system if you create your own shipping zones.
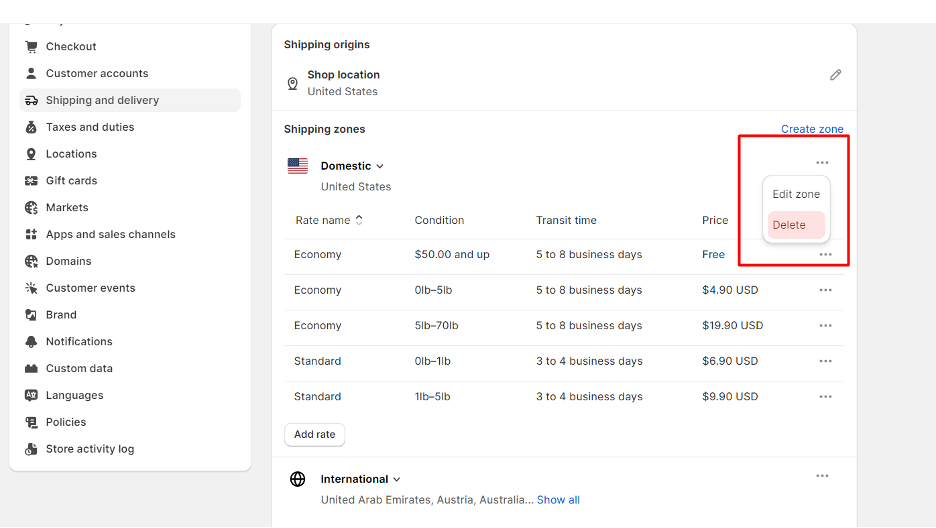
Next, click on this:
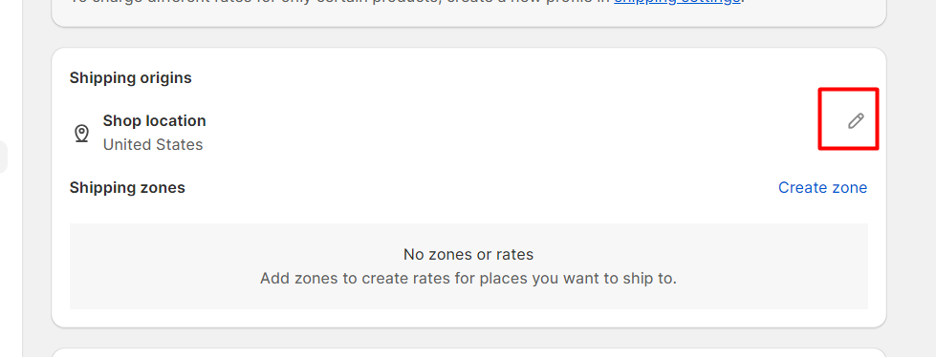
Then click on DONE.
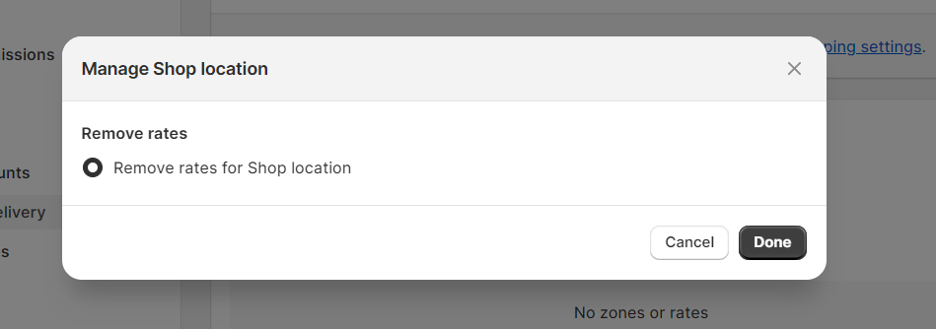
Then click SAVE at the top right:
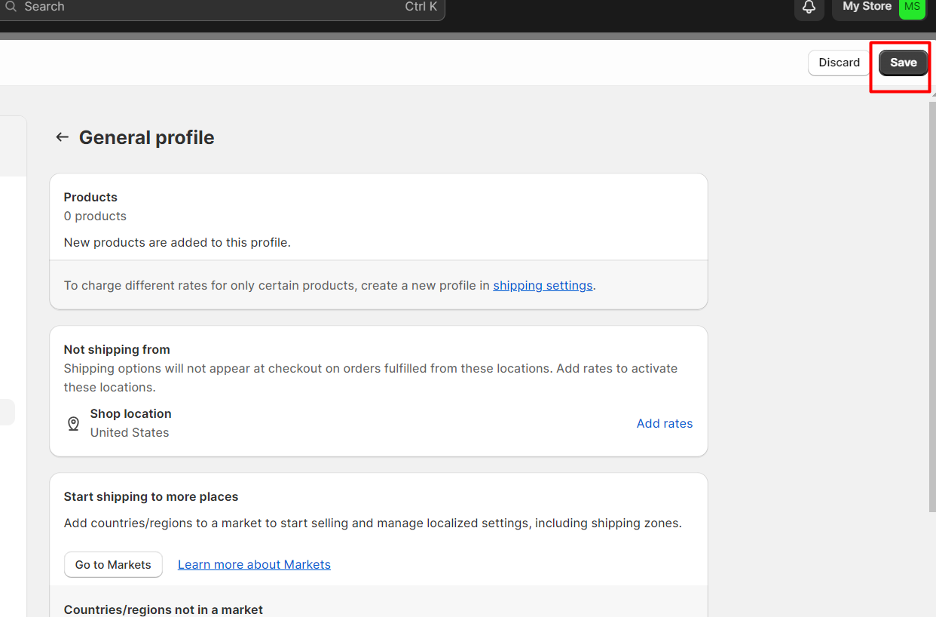
Step 5: Create a Shipping Zone
Finally, you can now create a SHIPPING ZONE. To do this, click on SHIPPING AND DELIVERY from the left panel. Then, click on the GENERAL SHIPPING RATES tab.
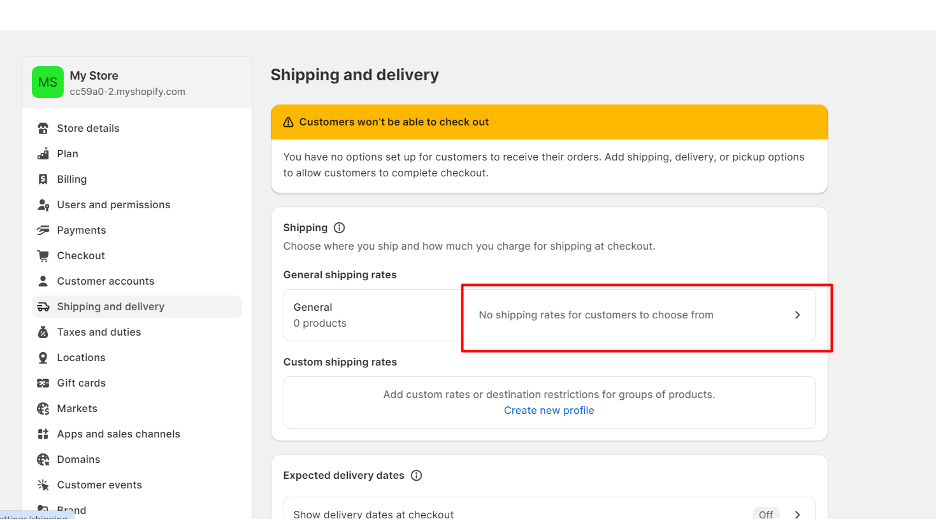
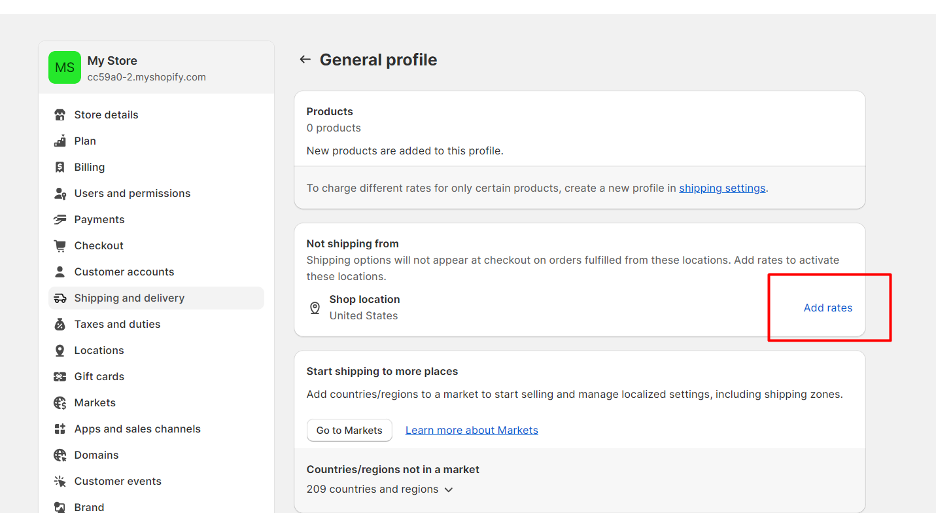
Next, click on ADD RATES.
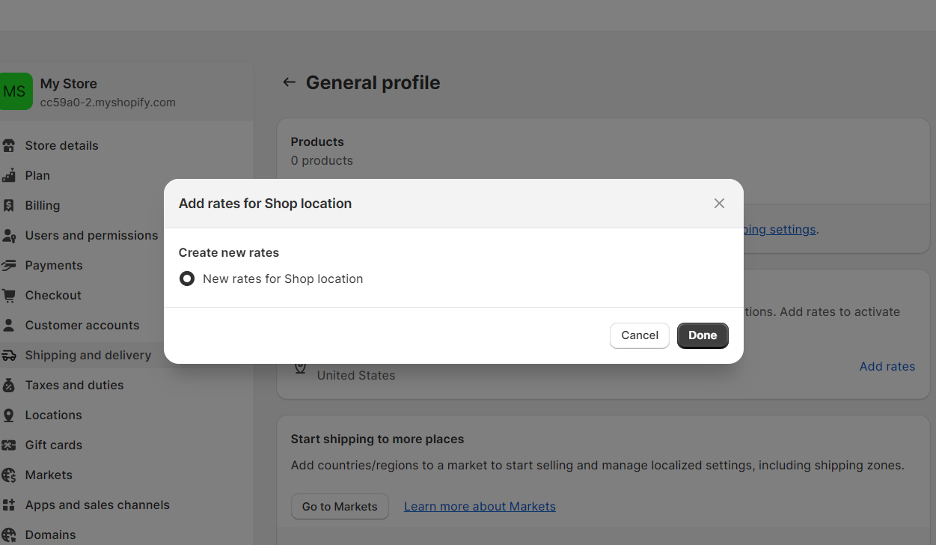
Then, click DONE.
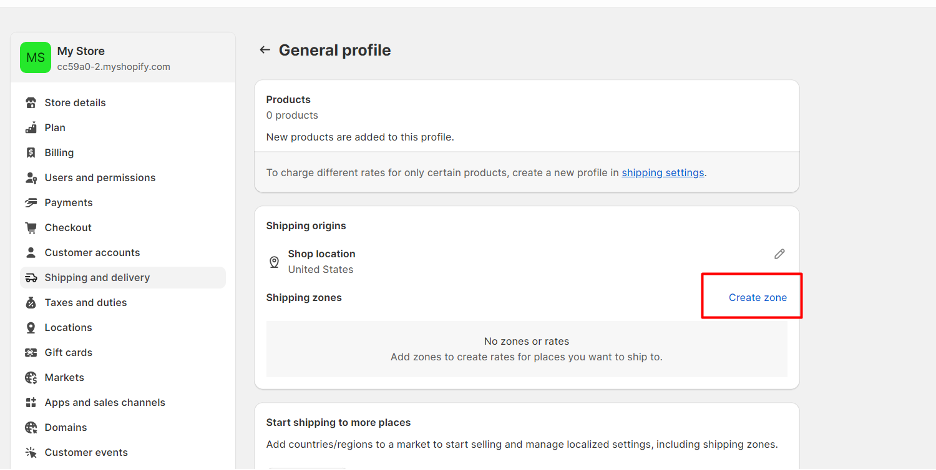
Once you do this, you will see a change on this dashboard. It will now allow you to create a zone. Click on CREATE ZONE.
Now, you can type a ZONE name, and then choose the countries for that zone. Click on DONE.
You will get an error that says, “NO RATE: Customers will not be able to check out.”
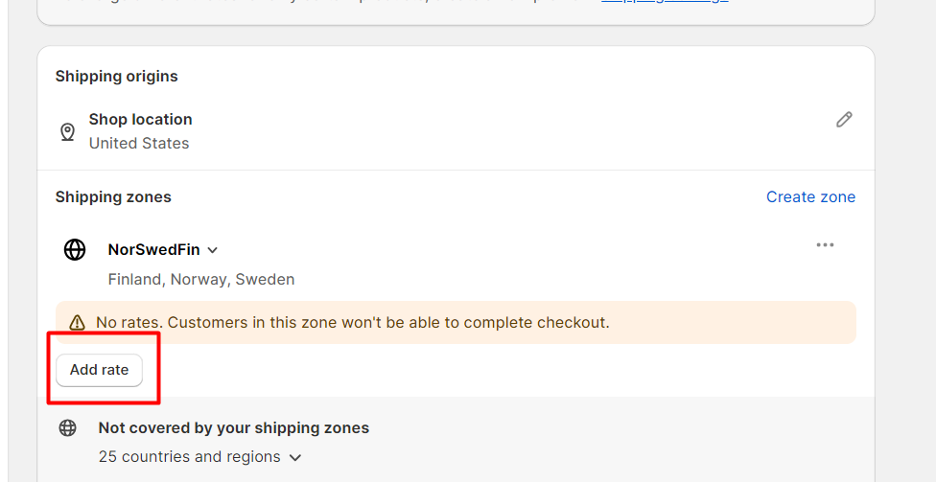
To fix this, just click on ADD RATE. You will see this:
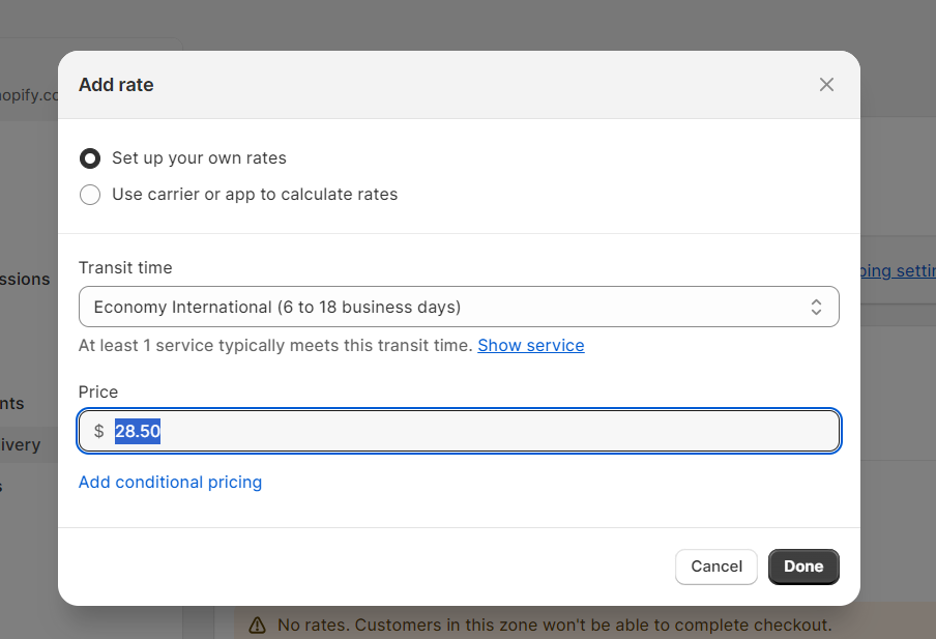
Here, you can type the price of the shipping, and then choose your TRANSIT TIME.
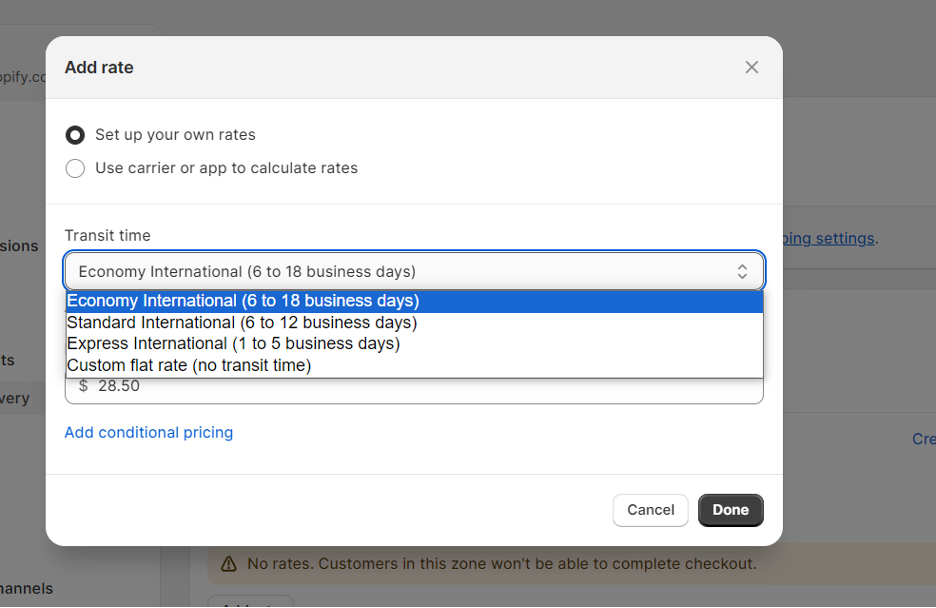
You can choose CUSTOM FLAT RATE if you want. Do not forget to click on DONE.
And that is it! You can use this shipping zone for your products. If you want to create a FREE SHIPPING option, just leave the PRICE box empty.
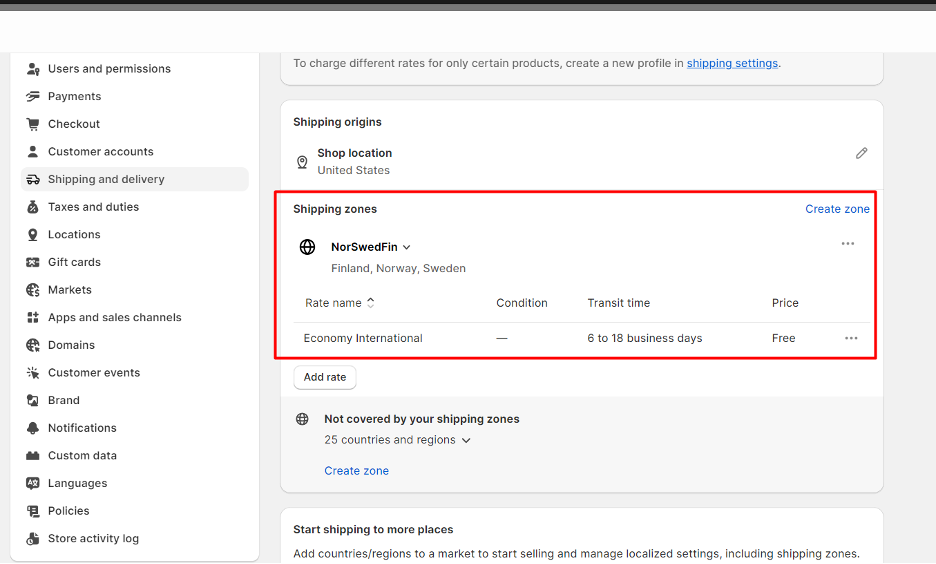
IMPORTANT NOTE: you cannot create new shipping zones unless you create a MARKET. I also strongly encourage you to delete the default shipping zones of Shopify as they will result in conflicts.
How to Automate Shopify Shipping with Tradelle
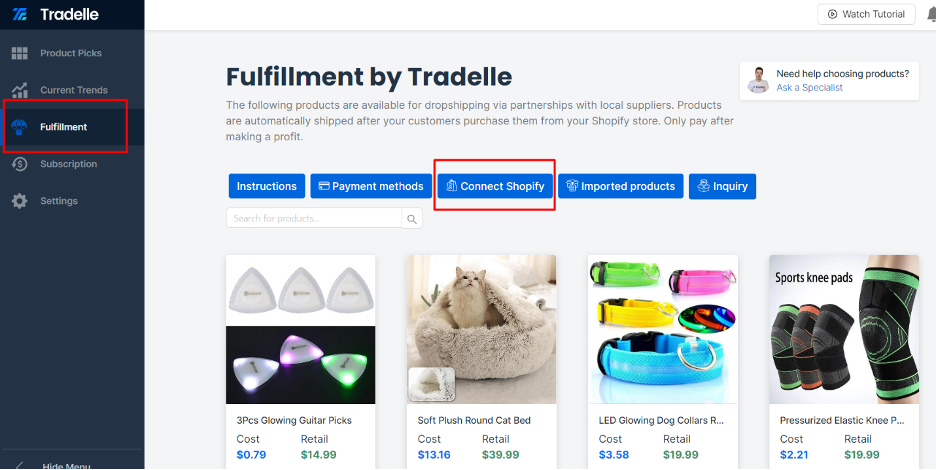
Shopify shipping automation is made easy with Tradelle, a supplier and fulfillment platform for dropshippers. What you need to do first is create a Tradelle account, and then connect this account with your Shopify store.
To do this, head on to your Tradelle dashboard and click on FULFILLMENT > CONNECT SHOPIFY.
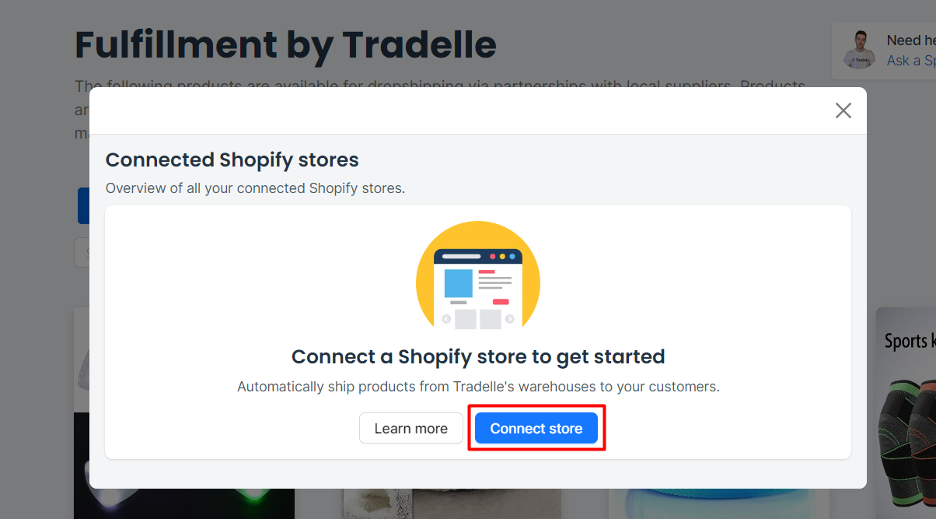
Next, click on CONNECT STORE.
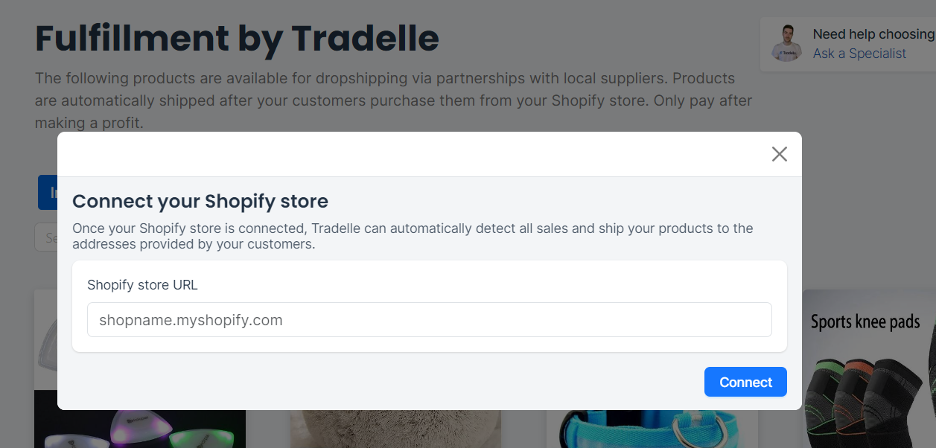
Then, you will see a box where you need to enter your Shopify store URL. Type it and then click on the blue CONNECT button.
Once the integration is complete, you can now import products from Tradelle to your Shopify store. Once a customer orders from your Shopify store, Tradelle, as a supplier, gets a notification and will ship the items to your customers immediately, even if you are asleep!
FAQ: Shopify Shipping
How does shipping work on Shopify?
Shopify has default shipping rates and zones after you sign up. You must delete these zones before you can create a new one.
Who pays for shipping on Shopify?
The customers pay for shipping on Shopify. The exception is if you set your shipping rates to FREE.
How can you automate shipping in Shopify?
Tradelle is one of the best options to automate Shopify shipping. Once you connect the two platforms, Tradelle will take care of the rest.
What are the best-converting shipping options in Shopify?
The best shipping option that converts is free shipping. Customers do not want to pay for shipping because it feels expensive. They would rather look for cheaper shipping options from local sellers. As such, you would do better if you offered free shipping.
Final Thoughts
The next step is to create a Tradelle account. With Tradelle, you can explore thousands of products that you can add to your Shopify store in one click. Tradelle also has analytics that give you insights and details about a product’s performance, capital, and possible profit margin.
Next, you can connect Tradelle with your Shopify store and start selling immediately. From here, all orders shall be automated, including all shipping activities.